MikroTik Conversion Guide
Prerequisites
- RouterOS v7 device running CAPsMAN 2 (tested on 7.18.1)
- RadSecProxy container running in your network.
- For self-serve, a CLI wallet prepared for onboarding: https://docs.helium.com/mobile/wifi-conversion-onboarding/
- For Helium Plus, certificates (
ca.pem,cert.pem,key.pem) supplied by the Helium Plus team and copied into the RadSecProxy directory. - UDP ports 1812/1813 open between MikroTik and the RadSecProxy host.
- Bridge interface already created and used as the datapath for Wi-Fi traffic.
High-Level Steps
- Deploy the RadSecProxy container and note its IP.
- Create a RADIUS profile that points to the RadSecProxy.
- Build a Wi-Fi configuration profile for the Helium Passpoint SSID.
- Apply the profile to an interface (or create a virtual AP).
- Verify operation and troubleshoot, if necessary.
1. Deploy RadSecProxy
At the time of writing, RouterOS does not support RadSec natively. Download the RadSecProxy container and run it in Docker.
- Unzip and untar the
radsec-proxy-main.tar.gzfile into the directory of your choice on the host machine. This will unpack the following items:Dockerfile- The Docker instructions on how to build the containerradsecproxy.conf- The radsecproxy config file is pre-populated to connect to Helium Network AAA serversdocker-compose.yml- File to start and stop the container as a daemon.
tar -xvzf radsec-proxy-main.tar.gz
- Into the same directory copy the 3 certificates obtained from the Helium Network
ca.pem- the root CA certificatecert.pem- the user certificatekey.pem- the key file matched to the certificate
- Start the container using:
sudo docker compose up -d
- If/when needed, stop the container using:
sudo docker compose down
Once the container is running, make sure you can ping it from the MikroTik router.
2. Add a RADIUS Profile
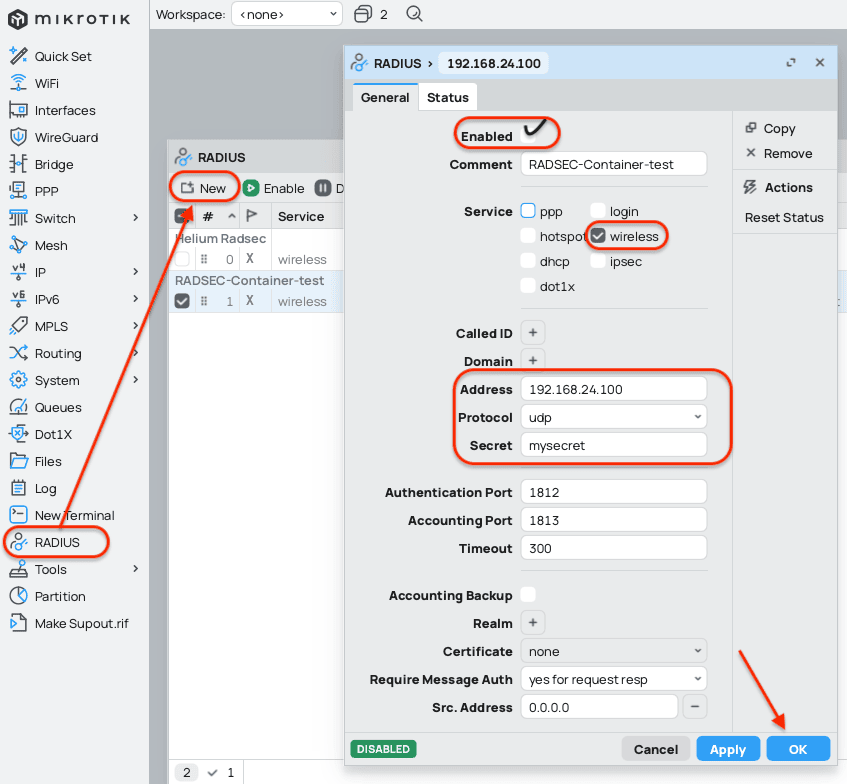
In RADIUS add a new entry:
| Field | Value |
|---|---|
| Comment | Helium AAA |
| Service | wireless |
| Address | IP_of_RadSecProxy |
| Protocol | udp |
| Secret | mysecret |
| Authentication Port | 1812 (default) |
| Accounting Port | 1813 (default) |
| Timeout | 300 s |
| Enabled | ☑︎ |
3. Create a AP Configuration Profile
Navigate to WiFi → Configuration and click Add (+).
Configuration Tab
| Field | Value |
|---|---|
| Name | helium-passpoint |
| Enabled | ☑︎ |
| Mode | ap |
| SSID | Helium |
Channel Tab
Select the band and channel width appropriate for your deployment. Leave Frequency blank for automatic channel selection.
Security Tab
Check WPA2 or WPA3 EAP under Authentication Types.
EAP Tab
Check EAP Accounting to enable it.
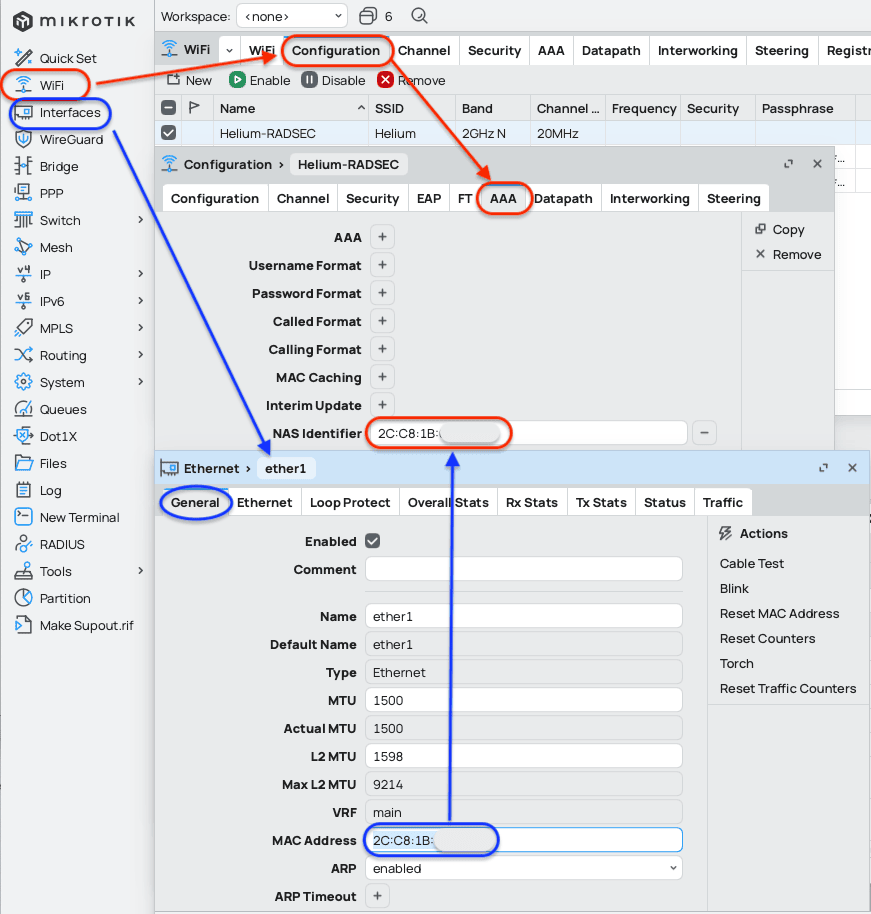
AAA Tab
Paste the MAC address of the WAN interface (usually ether1 by default) from the Interfaces menu, or enter the NAS-ID provided during Helium Plus onboarding.
Datapath Tab
| Setting | Value |
|---|---|
| Bridge | bridge1 (or the bridge used for LAN) |
Interworking Tab
The Interworking (Passpoint / Hotspot 2.0) profile is what advertises the Helium realms and carrier network identifiers over ANQP. If this profile is incomplete, handsets will see the SSID but silently fail to associate — so make sure the domain names, NAI realms, and 3GPP cellular network information are all present.
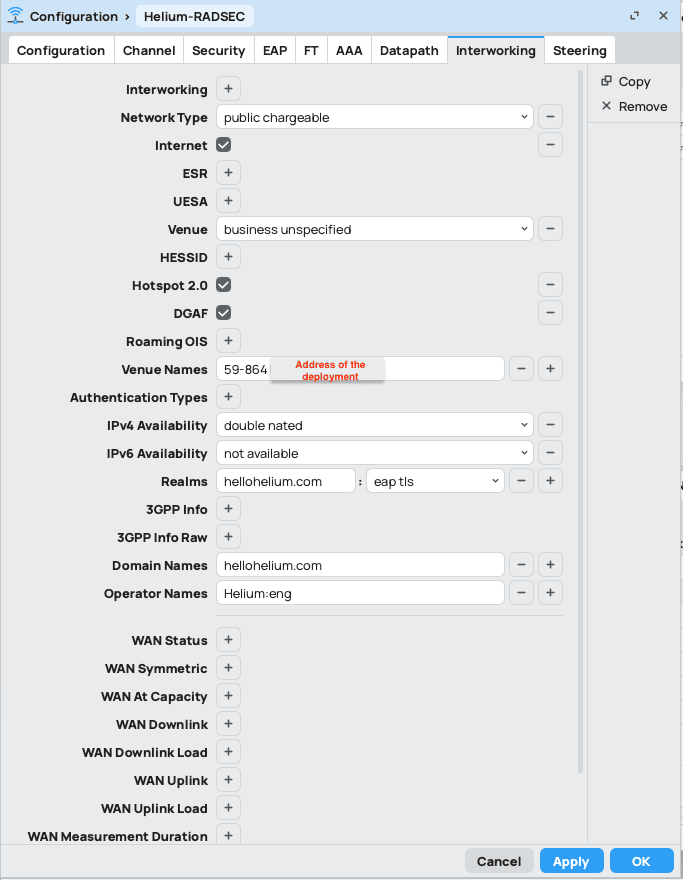
Fill in the profile as follows:
| Field | Value |
|---|---|
| ANQP Domain ID | 0 |
| Network Type | 2 (chargeable public network), access to internet |
| Operator Name | Helium-Operator (language code eng) |
| IP Address Type | IPv4 available (ip-type ipv4 2), IPv6 not available |
| Domain Names | freedomfi.com, hellohelium.com |
NAI Realms — the Helium-issued credentials use EAP-TLS (13):
| Realm | EAP method |
|---|---|
freedomfi.com | 13 EAP-TLS |
hellohelium.com | 13 EAP-TLS |
Add a further realm for each carrier your site is approved to offload. Those are SIM-based, so they
use EAP-AKA (23) and take the form wlan.mnc<mnc>.mcc<mcc>.3gppnetwork.org. The realms and their
MCC / MNC values are provided to you during Helium Plus onboarding.
3GPP Cellular Network Information (PLMN, MCC / MNC):
Add one PLMN entry per approved carrier, using the same MCC / MNC pairs as the realms above. Reach out to your Helium Plus contact if you do not have them.
Equivalent RouterOS CLI
The same profile can be applied from the CLI. This is a known-good Helium Passpoint profile —
substitute your onboarding NAS-Identifier on the aaa attribute line, and your onboarding carrier
realms and MCC / MNC pairs on the nai-realm and 3gpp-plmn lines:
hotspot profile Helium-profile
hotspot profile Helium-profile anqp-domain-id 0
hotspot profile Helium-profile network-type 2 access-internet
hotspot profile Helium-profile operator-name Helium-Operator language-code eng
hotspot profile Helium-profile ip-type ipv4 2 ipv6 0
hotspot profile Helium-profile domain-name freedomfi.com
hotspot profile Helium-profile domain-name hellohelium.com
hotspot profile Helium-profile nai-realm freedomfi.com encoding-type 0
hotspot profile Helium-profile nai-realm freedomfi.com eap-method 13
hotspot profile Helium-profile nai-realm hellohelium.com encoding-type 0
hotspot profile Helium-profile nai-realm hellohelium.com eap-method 13
# Then, per approved carrier, using the realm and MCC / MNC from your onboarding:
hotspot profile Helium-profile nai-realm wlan.mnc<mnc>.mcc<mcc>.3gppnetwork.org encoding-type 0
hotspot profile Helium-profile nai-realm wlan.mnc<mnc>.mcc<mcc>.3gppnetwork.org eap-method 23
hotspot profile Helium-profile 3gpp-plmn mcc <mcc> mnc <mnc>
security-object Helium security protocol-suite wpa3-aes-8021x
aaa attribute NAS-Identifier <your-nas-id>
ssid Helium hotspot-profile Helium-profile
save configuration
Newer RouterOS releases support RadSec natively (removing the need for the RadSecProxy container in step 1) and document the matching Passpoint / Orion Wi-Fi setup. See MikroTik's Interworking Profiles — Configuration guide using native RadSec and Orion Wi-Fi.
4. Attach the Profile to an Interface
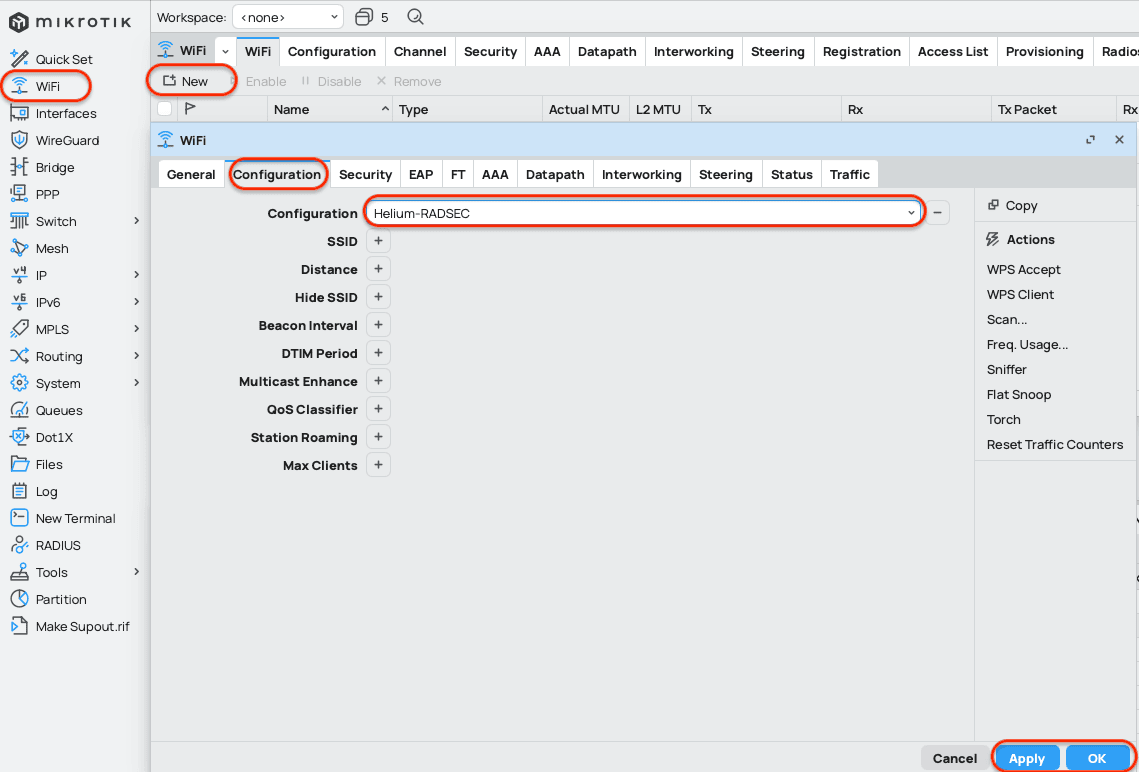
Assign the configuration profile to the desired Wi-Fi interface. Either click New (this will create a virtual AP) or Edit an existing master interface.
Make sure to select the correct 5/2.4 interface according to the band defined in the configuration profile.
Enable it on the General tab.
5. Verification
- Confirm that the
HeliumSSID is visible. - In logs, watch for successful
radiusauthentication messages. - On the RadSecProxy host use
docker logs -f radsecproxyto ensure TCP/TLS sessions are established. - On a compatible handset, ensure automatic connection with the carrier profile.